Wednesday, May 10, 2017

Right Knowledge Leads to Safety

Hi there!


One of the toughest job in the world is working inside the laboratory. Every day, laboratory personnel expose their selves to different hazards inside the laboratory. Sad to say, that most of these hazards are not seen by the naked eye. These hazards may include gas molecules, virus, ultraviolet rays, fumes, x-rays, oil smokes and a lot more. But these hazards can be prevented from causing harm by following the safety rules and precautions inside the laboratory. A simple way of wearing Personal Protective Equipment or regularly washing hands before and after working in the laboratory means a lot to your safety. But mind you guys, these hazards mentioned above are not the only danger that can be encountered in the laboratory. There are a lot more than you could imagine. People can also be a hazard in the laboratory.
To enlighten you more, let’s take a look at the picture and the explanation below how each of them can be a hazard in the laboratory.
  1. Animals – For most animal research laboratories, animals can cause allergens through animal bites or animal manure to humans.
  2. Biological agents - Proper assessment of pathogens used in the laboratory so proper safety measures shall be implemented.
  3. Chemicals - is probably considered the most hazardous as most of them are carcinogenic and can cause sterility. It is important to know every chemical that you will be using inside the laboratory so that you can also employ the right safety measures.
  4. Equipment - Right knowledge of the usage of equipment is a must for lab personnel to learn.
  5. Electrical - Label all electrical outlets respectively if it is 220V or 110V.
  6. People - Misconceptions are the common problems faced by laboratory personnel. These includes the confusion on what is the right equipment for a certain application. For example, confusing a vertical laminar flow for a Class II biological safety cabinet. Let me correct you on this one, Laminar flow is used for the preparation of mediums like agars, plant and fish tissue culture and microbes that are not pathogenic and does not cause harm to healthy human adult. If you will look at the airflow of the laminar flow hoods, the air is blown towards. Laminar flow ensures your sample protection from contamination. For Biological Safety Cabinets, the purpose is to provide protection for user and sample. The airflow for BSC is specially designed to perform the task of protecting the user from inhaling contaminated air from the sample and at the same time protecting the sample from cross contamination. BSC is used in handling microorganisms that are pathogenic and could impose harm to healthy adults.  Also, the inappropriate choice of installation site for every equipment can also pose a danger in the laboratory.
I have shown you the common user mistakes in the laboratory. Without the right knowledge, YOU could also be a hazard in the laboratory. Without the proper information, you could bring the laboratory into danger and along with other laboratory personnel too. Laboratory accidents can be best prevented with the right information and correct assessment of every hazard. Now that you know all of these, may it serve as a precaution to you to do what is correct. You can attain a good result of every experiment that you are doing if you also ensure your safety.

Have a happy working day in the laboratory! Be safe guys!

Thursday, May 4, 2017

Agars- the oldest yet the latest microbiological tool

Hi, there guys!
It’s been a long time but guess what, I’m back. Anyway, as a laboratory personnel, I believe, you are already exposed to different kinds of pathogens and the risk groups which we have discussed in the previous post. Pathogens were given the emphasis on my previous blog, so now, I would like to put the focus on Agars.
What is an Agar? Agar is a gelatinous substance obtained from various kinds of red seaweed and used in biological culture media and as a thickener in foods. Nowadays in laboratory, agar is used as a growth medium in which microorganisms including bacteria and fungi, can be cultured and observed under the microscope. 
Without agars, there will be no cultures too. They are one of the most important microbiological tools inside the laboratory, it may be for research or for clinical analysis. Agars have been widely used as microbiological mediums since 1882 by a German Microbiologist named Walter Hasse, assistant of Robert Koch up until now. Agars have contributed a lot not only in the field of microbiology but to a lot of fields in science. So today, let take a look at the different types of agars and to what pathogens they are applied to use for.
Below are the types of agars that are commonly used:


Here are the list of common types of agar with brief definition.
  1. Nutrient Agar
    - Will grow the largest number of different types of microbes - fungi and bacteria. Yet, not all bacteria can grow on these. Some find it too rich, and others find it deficient. The nutrient in this is beef broth, and some extracts from yeast.
    Escherichia coli, Bacillus subtilis, Streptococcus faecalis, and Saccharomyces diastaticus commonly grown in this agar.
  2. Blood Agar
    - Contains blood cells from an animal example sheep, most bacteria will grow on this medium.
    Staphylococci and Streprococci are common pathogens grown in blood agar.
  3. Sabouraud Agar
    - Used for fungi and has a low pH that will kill most bacteria. It contains gentamicin, which is an aminoglycoside antibiotic. Gentamicin can also treat many different types of bacterial infections, particularly Gram-negative infection.
    Examples of pathogens used are
    Aspergillus spp., Cryptococcus neoformans, etc.
  4. Chocolate Agar
    - Comprised of sheep blood that provides the X and V factors necessary for Haemophilus growth, this is a nutrient medium which is used in culturing fastidious organisms such as Haemophilus species and Neisseria. Chocolate agar, however, does not reveal hemolysis data, so species differentiation among the members of Haemophilus must be performed in another manner.
  5. MacConkey Agar
    - This is an agar upon which only Gram-negative bacteria can grow. What is more is that coli will grow into red colonies, as there is a pH indicator present. It should be mentioned that MacConkey agar powder comes in two versions: one with the sugar lactose in it, and one without any added sugars. Since E.coli ferments sugars to acids (thus the red color), one can add one of the many different kinds of sugars to this sugar-free MacConkey agar and see if red colonies develop. If you get red colonies, you know the E.coli strain you are using can use that sugar.
  6. Miller's LB Agar
    - This common variation of LB agar appears to have the same components as LB, just in different proportions.
  7. Thayer-Martin Agar
    - Chocolate agar designed to isolate Neisseria gonorrhoeae, also known as "gonococcus," which is a species of Gram-negative bacterium responsible for the disease gonorrhoea.
  8. XLD Agar
    - Xylose lysine deoxycholate agar. It is used for the culture of stool samples, and contains two indicators. It is formulated to inhibit Gram-positive bacteria, while the growth of Gram-negative bacilli is encouraged. The colonies of lactose fermenters appear yellow.
  9. Tryptic Soy Agar
    - A basic medium used for culturing many kinds of microorganisms. Tryptic soy agar is mainly used as an initial growth medium for the purposes of observing colony morphology, developing a pure culture, achieving sufficient growth for further biochemical testing, and culture storage.
  10. LB (Luria Bertani) Agar
    - A subtype of nutrient agar, this is the general medium for microbiology studies and may be used for routine cultivation of not particularly fastidious microorganisms. Also, does not preferentially grow one kind of bacteria over another.
  11. Neomycin Agar
    - Contains the antibiotic neomycin, which found in many medications such as creams, ointments and eye drops. Neomycin was discovered in 1949 by the microbiologist Selman Waksman, and it is produced naturally by the bacterium Streptomyces fradiae. Moreover, Neomycin has a broad spectrum of effects, killing both gram-positive and gram negative bacteria. It is relatively toxic to humans, and some people have allergic reactions to it. Often, Neomycin agar is used for culturing organisms anaerobically. Neomycin stops the growth of gram-negative bacilli and staphylcocci, allowing Streptococcus species to grow more abundantly.

There you have it guys! Please also note that incubation period varies depending on what microorganism you are working on. Don’t forget that all microorganisms grown during the experiment should be demolished before discarding. The best way to dispose bacterial cultures is to pressure sterilize them in a heat stable biohazard bag. I hope that this gave additional information that you can use when working in the laboratory!
                                    Have a great day! And best of luck on your job!


Source:  http://www.sciencebuddies.org/science-fairprojects/project_ideas/MicroBio_Agar.shtml

Thursday, March 2, 2017

What are the risk groups?

Hi, there guys!
I’m back and I’ve got something important to share with you all. Most of us sometimes work more than 24 hours in the laboratory without even knowing what are the risks that we face and the classification of microorganisms we are dealing with. Risk, as defined, is a situation involving exposure to danger. Risk group is the result of a classification of microbiological agents based on their association with, and resulting severity of disease in humans. It is important to know these things as we should always protect ourselves while working in the laboratory. Our safety inside the laboratory is our main priority. So, to give more ideas with this, check the table below as an easy guide for proper identification of microorganisms you’re dealing within your laboratory.


RISK GROUPS
Each agent is assigned to one of four levels of risk to humans, animals, and the environment.
Risk Level 1 having the lowest-risk, Level 4 being the highest. 


There you have it guys. These things are very valuable for you to be informed. We should know what specific microorganism we handle inside the laboratory so that we can also choose the right biosafety cabinet to use. Always remember, an ounce of prevention is always better than a pound of cure.

Tuesday, February 21, 2017

Your Safety is Important

Hi, there guys! 


As a laboratory personnel, you are always exposed to harmful microorganisms and even chemicals. It is always best to shield yourself against all these damaging factors. While doing your job, you ensure that you get the best results and that you should always bear in mind that safety is always your priority. Biosafety cabinet is one of the most common equipment that you will see in the laboratory. It is also one of the most frequently used equipment. A biosafety cabinet (BSC), also called biological safety cabinet or microbiological safety cabinet is an enclosed, ventilated laboratory workspace for safely working with materials contaminated with pathogens requiring a defined biosafety level. It is no jest to work with biosafety cabinet thus trained people should be the one who can use BSC. To give you a little reminder on how to stay safe in the laboratory, here’s a simple checklist.


Here you are, guys! Safety starts within US! Let’s have a Happy and Safe work zone!
Some of us knew the safety rules and precautions but, tend to neglect it. We should always remember the rules for our safety and for the good of others.


Working in the laboratory there will always be danger that comes along. You expose yourself to all the hazards inside the laboratory. It is a must that you should know the laboratory safety rules. Protect yourself at all times. Your safety must not be compromised, it must be prioritized!

Tuesday, October 18, 2016

Working Safely with your Biological Safety Cabinet

Loading...

Loading...

Tuesday, August 23, 2016

The KI-Discus Test

Loading...

Loading...

Friday, August 19, 2016

Biosafety Communities

Loading...

Loading...

Monday, August 8, 2016

Alarms are for Safety

Loading...

Loading...

Wednesday, July 27, 2016

Space Matters

Loading...

Loading...

Friday, July 22, 2016

Pick Your Choice for Laboratory Safety

Loading...

Loading...

Friday, July 15, 2016

Better Ways to Decontaminate

Loading...

Loading...

Tuesday, July 5, 2016

Learn your Biosafety Standards

Loading...

Loading...

Thursday, June 23, 2016

Understanding the Applications of Microbiology

Loading...

Loading...

Wednesday, June 1, 2016

Make your Laboratory Competent: Practice GLP

Loading...

Loading...

Microbial Pure Culture

Loading...

Loading...

Thursday, May 5, 2016

Know your Biosafety Levels

Loading...

Loading...

Friday, January 15, 2016

What you need to know about ULPA filters?

What is an ULPA filter? Maybe this is what comes into your mind when you have read the title of this blog.

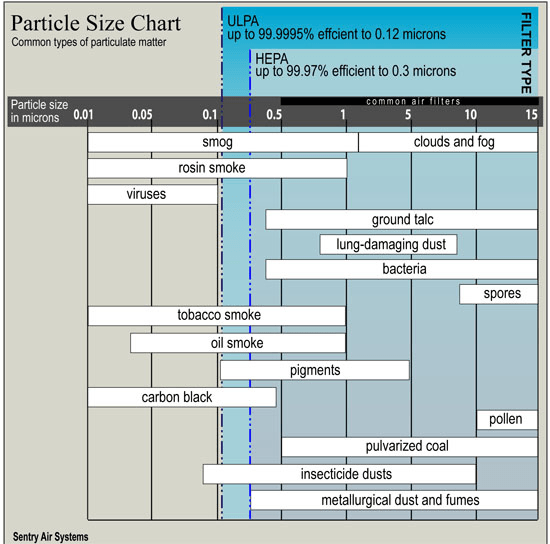
Well, ULPA (Ultra-Low Penetration Air) Filter is a dry extended media filter in a rigid frame, with a minimum particle-collection efficiency of 99.999%. Depending on the filter, the particle-collection efficiency can be measured at 0.3µm or at MPPS. (White, 2009)

It is different from HEPA (High Efficiency Particulate Air) filters in which HEPA filters are capable of removing 99.97% of particles with 0.3 Âµm diameter. 
Photo credits:
http://www.globalspec.com/

Which is better?

Before answering that question, these are the things you should know about ULPA filters, in comparison with HEPA filters. 

Photo credits:
http://labcrafts.com/
1. ULPA filters have a better filtration efficiency. ULPA filters have an efficiency of 99.999% compared to the efficiency of HEPA filters (99.99%). 

1 vs 10. If 1 million spores are released on the work zone, only 1 spore will escape from ULPA filter while 10 spores will escape from HEPA filter. As you have noted above, ULPA filters exceeds HEPA filter efficiency. Therefore, it provides better operator and product protection.

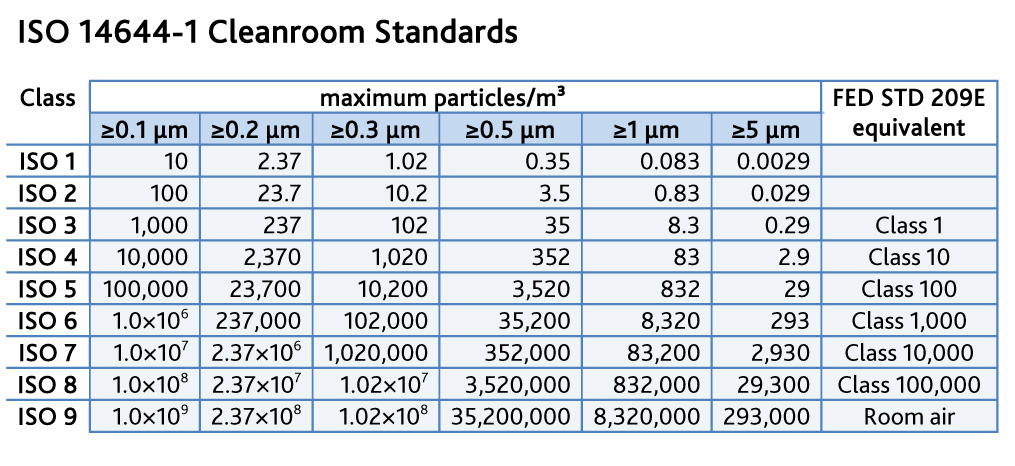
2. ULPA filters provide an ISO Class 3 work zone. 

What is ISO cleanroom classification? 

According to Terra Universal, ISO (International Standards Organization) cleanroom classifications are rated based on how much particulates of specific sizes exist per cubic meter. ISO Class 1 is the "cleanest" cleanroom, while ISO Class 9 is the "dirtiest" cleanroom. HEPA filters provide an ISO Class 5 work zone. Thus, ULPA filters offer substantially better product protection against contaminants. 

Photo credits:
http://www.portafab.com/
Photo credits:
http://www.nafahq.org/
3. ULPA filter media has 5% higher pressure drop. As the pressure drop increases, the electrical power consumption increases. Moreover, as the pressure drop increases, filter life decreases. If HEPA and ULPA filters have the same filter media, HEPA filter has a longer filter life. 

As a solution to this problem, ULPA filters can be designed to have larger filter media to have the same filter life as HEPA.


Photo credits:
http://animations.fg-a.com/

4. ULPA filter replacement cost is about the same, than HEPA filter. 

On average, filter replacement cost is about $300 to 400. 


So which is better?

At the same filter life and replacement cost, ULPA filters reduce the chance of operator infection and product contamination. 

References:

FS209E and ISO Cleanroom Standards. Terra Universal. Available from http://www.terrauniversal.com/cleanrooms/iso-classification-cleanroom-standards.php

Pressure Drop Considerations in Air Filtration. National Air Filtration Association. Available from http://www.nafahq.org/pressure-drop-considerations-in-air-filtration/

White, E. 2009. HEPA and ULPA Filters. Journal of Validation Technology. [Online] p.54

Sunday, January 3, 2016

Beating post-holiday blues and ensure safety in the lab!

Photo credits:
http://thebalancingact.net.au/
Urg, can you believe it? The holiday season finally came to an end. Well, technically it ended on January 4. And what does that mean to us, lab people? It means we are back in the lab. Well, I feel you, guys. It is really hard to start working again after the holidays. Perhaps, many of us are suffering from post-holiday blues, or worse post-holiday syndrome. We can't deny it ~ after the holiday break, we may feel sad or unhappy. Don't be alarmed. It is a normal phenomenon. Hmm, I know it is hard but we should accept reality, right? Look into the bright side ~ you will be again culturing microbes. For sure, they have missed you. 

So what are you waiting for? 
Photo credits:
https://img1.etsystatic.com

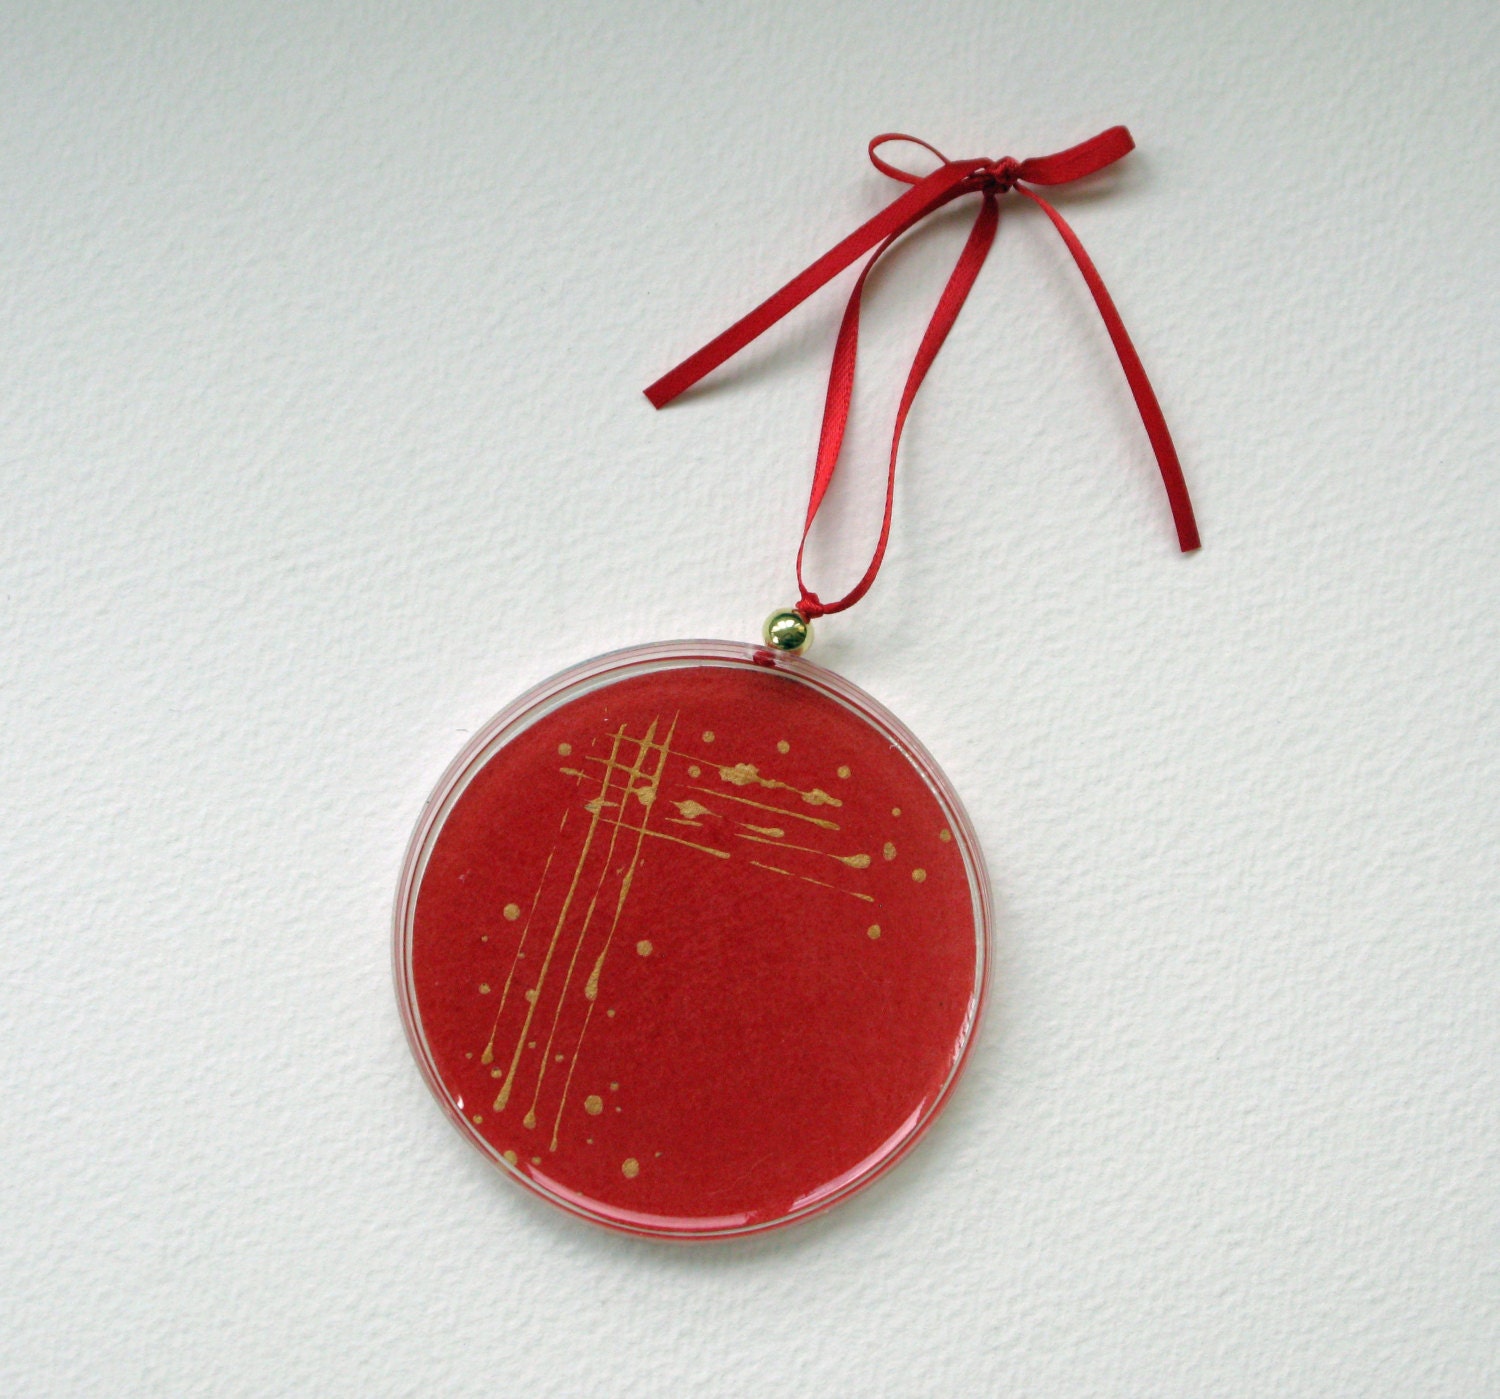
But wait! Before you streak your Petri dishes, check first if it is safe to work in your laboratory, especially in your biological safety cabinet. 

So here are a few questions for you to answer.

1. Is my BSC certified?
It is a brand new year, so for biosafety cabinets that have not been certified yet, better contact your service provider and ask for re-certification of your BSC. BSC certification is needed to ensure that:
- its performance meets manufacturer's specifications
- the filter is not damaged, if physically relocated
- the cabinet's airflow and containment factors are within safe limits.

2. Do I wear the necessary PPEs?
Photo credits:
https://heavydutytruckpart.files.wordpress.com
Sometimes, holiday season may cause us to forget all these laboratory protocols. Well, before you handle your specimens, make sure you are wearing necessary personal protective equipment. This is to minimize exposure to biohazards.

3. Have I allowed my BSC to purge prior to start of work?
To purge means to allow time for contaminated air to be removed from the cabinet environment. Yes, despite being unused during the holidays, the air inside your BSC should be purged. Better safe than sorry, ayt? Leave the blower on for at least 5 minutes before using the cabinet.

4. Is the alarm of my BSC functioning?
Photo credits:
http://cloud-3.steamusercontent.com/
Better check if the alarm is working or not, before you start your work. This is to ensure that your BSC is fully operational, including the alarms. Some BSCs have sophisticated alarm system, including sash alarms. Try to move the sash to an improper position. You will expect that the sash alarm will sound. Make sure the alarm is not in mute though. If the alarm still does not sound, then there's something wrong with your BSC. Consult your service engineer for assistance.

Photo credits:
http://a.files.bbci.co.uk/
5. Have I surface-decontaminated my BSC work zone?
Same with purge cycles, your BSC work zone should be decontaminated prior to start of work even if it is unused during the holiday break. Materials to be placed inside the BSC should also be surface-decontaminated. Do not forget to surface decontaminate all items within the BSC and remove from the cabinet when work is completed.

6. Am I using a Bunsen burner inside the BSC?
Oops, do not forget that a Bunsen burner should not be used inside the BSC since it can cause airflow disturbance and can endanger you. Your samples will also be at risk of cross contamination. When absolutely necessary, ON/OFF switching type, or electric burners can be used.

I bet you are ready to work after you've answered the questions above. 

So beat the post-holiday blues and ensure safety in the lab!

Happy culturing!

Monday, December 21, 2015

Working safely in your biological safety cabinet Part 4

Here is Part 4 of this blog series to guide you in working safely in your BSC. 

Photo credits:
http://www.escoglobal.com/
13. Only trained personnel should use the cabinet. Since it requires sufficient theoretical and practical knowledge for you to work safely with biosafety cabinets, make sure only trained personnel should use the cabinet while you are gone. Or better yet, limit the access to the lab. Good news! Some biosafety cabinets have access control provisions ~ key switch and/or password protection feature ~ to make sure only authorized personnel can use the cabinet. Check if your biosafety cabinet has this feature!


14. Proper work attire. According to OSHA, personal protective equipment is worn to minimize exposure to serious workplace injuries and illnesses. Wearing a back-fastened lab coat (to protect the operator from splashes) as well as double-gloving (over the cuffs) should be practiced. Masks and safety glasses may be  required for some procedures. 
Photo credits:
https://www.facebook.com/EscoBiologicalSafetyCabinets1/
15. Work within the safe areas. Do not obstruct any of the air grilles in the front or back of the work zone. The front intake grille of biosafety cabinets must not be blocked with paper, equipment or other items. Work as deep into the work zone as possible. Equipment that generate aerosols, e.g. mixers and centrifuges, should be placed towards the rear of the cabinet. Bulky items should be placed to one side of the interior of the cabinet.
Photo credits:
https://www.facebook.com/EscoBiologicalSafetyCabinets1/
16. Observe proper aseptic technique. Before starting your work, plan ahead of time. Place all items inside the cabinet, including biohazard collection bags before use to avoid having to take your arms out from the work zone. Surface decontaminate first before removing your arms from the cabinet. Moreover, move arms slowly out of the cabinet. Always work from "clean" to "dirty", segregating contaminated and non-contaminated materials.
Photo credits:
https://www.utexas.edu/
Here is a video of Working Safely in your Biological Safety Cabinet. (Video credits from Esco Global)


Remember, SAFETY FIRST before anything else.

Sunday, December 20, 2015

Safety reminders before the holiday break!

Happy holidays!

Photo credits:
http://i.123g.us/

I can feel your excitement for the upcoming holidays! But guess what we have a lot of work to do. Who can relate with this? 

But do not worry my fellow laboratory scientists, we can continue our work after the holidays, right?
Photo credits:
http://38.media.tumblr.com/

However, remember that we are dealing with biohazards so we should not leave our laboratories as it is. We must ensure that our labs are safe to return to when we get back after the holiday break. 

So here are a few safety reminders:
1. Observe surface decontamination. Ensure that your biosafety cabinet is appropriately decontaminated before you leave. All items within BSCs, including equipment, should be surface-decontaminated and removed from the cabinet. Before you leave, guarantee that all work surfaces, the sides, back and interior of the glass shall be wiped with an appropriate disinfectant. 

Photo credits:
http://www.roth-heat.com/
2.  Do not rely solely on UV. In decontaminating your cabinet, you can use the UV light. But make sure you also use disinfectants. Remember, UV light is  not a substitute for routine surface decontamination.

3. Do not use the cabinet as a storage area. Gentle reminder guys, do not overload the cabinet with unnecessary items. Moreover, before you leave, make sure your biosafety cabinet should be free from materials. It should be empty when not in use, since residual culture media may provide an opportunity for microbial growth!

4. Only trained personnel should use the cabinet. Since it requires sufficient theoretical and practical knowledge for you to work safely with biosafety cabinets, make sure only trained personnel should use the cabinet while you are gone. Or better yet, limit the access to the lab. Good news! Some biosafety cabinets have access control provisions ~ key switch and/or password protection feature ~ to make sure only authorized personnel can use the cabinet. Check if your BSC has this feature!
Photo credits:
http://www.rhizolab.com/

 Ooops, for the BSCs that are not yet re-certified, make sure when you come back after the holidays, seek for your BSC's annual re-certification to start the year safe in working with biohazards.